ASP.NET Core: CRUD With React.js And Entity Framework Core
ASP.NET Core: CRUD With React.js And Entity Framework Core

In this article, we are going to create a web application using ASP.NET Core and React.js with the help of the Entity Framework Core database first approach. We will be creating a sample Employee Record Management system and performing CRUD operations on it. To read the inputs from the user, we are using HTML Form elements with required field validations on the client-side. We are also going to bind a dropdown list in the HTML Form to a table in the database using EF Core.
We will be using Visual Studio 2017 and SQL Server 2014.
Prerequisites
- Install .NET Core 2.0.0 or above SDK from here.
- Install the latest version of Visual Studio 2017 Community Edition from here.
- Download and install the latest version of Node.js from here.
- SQL Server 2008 or above.
Source Code
Before proceeding, I would recommend you to get the source code from GitHub.
Creating the Tables
We will be using two tables to store our data.
- tblEmployee: Used to store the details of employees. It contains fields such as EmployeeID, Name, City, Department, and Gender.
- tblCities: This contains the list of cities and is used to populate the City field of the tblEmployee table. It contains two fields, CityID and CityName.
Execute the following commands to create both tables.
CREATE TABLE tblEmployee (
EmployeeID int IDENTITY(1,1) NOT NULL PRIMARY KEY,
Name varchar(20) NOT NULL ,
City varchar(20) NOT NULL ,
Department varchar(20) NOT NULL ,
Gender varchar(6) NOT NULL
)
GO
CREATE TABLE tblCities (
CityID int IDENTITY(1,1) NOT NULL PRIMARY KEY,
CityName varchar(20) NOT NULL
)
GO
Now, we will put some data into the tblCities table. We will be using this table to bind a dropdown list in our web application from which the desired city can be selected. Use the following insert statements.
INSERT INTO tblCities VALUES('Matara');
INSERT INTO tblCities VALUES('Galle');
INSERT INTO tblCities VALUES('Nugegoda');
INSERT INTO tblCities VALUES('Colombo');
INSERT INTO tblCities VALUES('Battaramulla');
Now, our database part has been completed. So, we will proceed to creating the MVC application using Visual Studio 2017.
Create an MVC Web Application
Open Visual Studio and select File >> New >> Project. After selecting the project, a “New Project” dialog will open. Select .NET Core inside the Visual C# menu from the left panel.
Then, select “ASP.NET Core Web Application” from the available project types. Set the name of the project as ReactCrudDemo and press OK.

After clicking on OK, a new dialog will open asking you to select the project template. You can observe two drop-down menus at the top left of the template window. Select “.NET Core” and “ASP.NET Core ” from these dropdowns. Then, select the “React.js” template and press OK.

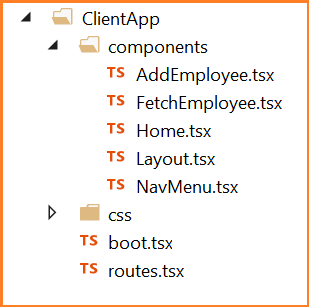
Now, our project will be created. You can observe the folder structure in Solution Explorer as shown in the below image.
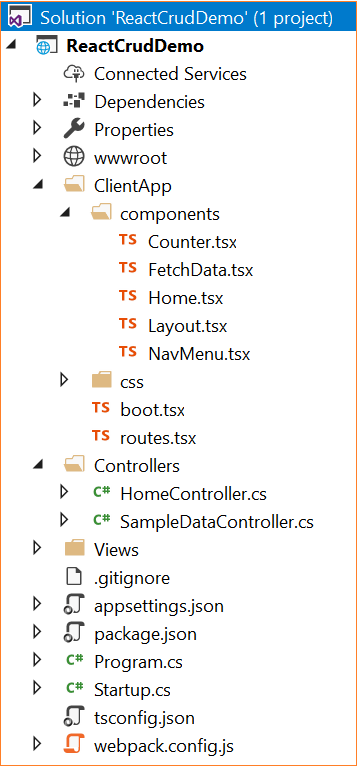
Here, we have our Controllers and Views folders. We won’t be touching the Views folders for this tutorial since we will be using React.js to handle the UI. The Controllers folders will contain our Web API controller. The point of interest for us is the ClientApp folder where the client side of our application resides. Inside the ClientApp/components folder, we already have a few components created which are provided by default with the React.js template in VS 2017. These components will not affect our application, but for the sake of this tutorial, we will delete the fetchdata.tsx and counter.tsx files from ClientApp/app/components.
Adding the Model to the Application
We are using the Entity Framework Core database first approach to create our models. Navigate to Tools >> NuGet Package Manager >> Package Manager Console.
We have to install the package for the database provider that we are targeting, which is SQL Server in this case. Hence, run the following command:
Install-Package Microsoft.EntityFrameworkCore.SqlServer
Since we are using Entity Framework Tools to create a model from the existing database, we will install the tools package as well. Hence, run the following command:
Install-Package Microsoft.EntityFrameworkCore.Tools
After you have installed both the packages, we will scaffold our model from the database tables using the following command:
Scaffold-DbContext "Your connection string here" Microsoft.EntityFrameworkCore.SqlServer -OutputDir Models -Tables tblEmployee, tblCities
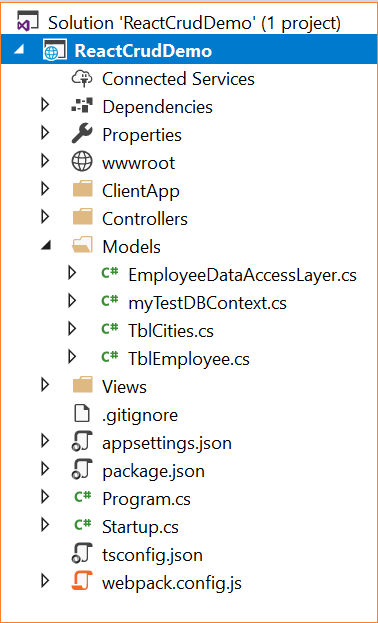
Do not forget to put your own connection string (inside “ “). After this command is executed successfully you can observe a Models folder that has been created and it contains three class files myTestDBContext.cs, TblCities.cs, and TblEmployee.cs. Hence, we have successfully created our Models using the EF core database first approach.
Now, we will create one more class file to handle database related operations.
Right-click on the Models folder and select Add >> Class. Name your class EmployeeDataAccessLayer.cs and click the Add button. At this point in time, the Models folder will have the following structure.
Open EmployeeDataAccessLayer.cs and put the following code to handle database operations.
using Microsoft.EntityFrameworkCore;
using System;
using System.Collections.Generic;
using System.Linq;
using System.Threading.Tasks;
namespace ReactCrudDemo.Models
{
public class EmployeeDataAccessLayer
{
myTestDBContext db = new myTestDBContext();
public IEnumerable<TblEmployee> GetAllEmployees()
{
try
{
return db.TblEmployee.ToList();
}
catch
{
throw;
}
}
//To Add new employee record
public int AddEmployee(TblEmployee employee)
{
try
{
db.TblEmployee.Add(employee);
db.SaveChanges();
return 1;
}
catch
{
throw;
}
}
//To Update the records of a particluar employee
public int UpdateEmployee(TblEmployee employee)
{
try
{
db.Entry(employee).State = EntityState.Modified;
db.SaveChanges();
return 1;
}
catch
{
throw;
}
}
//Get the details of a particular employee
public TblEmployee GetEmployeeData(int id)
{
try
{
TblEmployee employee = db.TblEmployee.Find(id);
return employee;
}
catch
{
throw;
}
}
//To Delete the record of a particular employee
public int DeleteEmployee(int id)
{
try
{
TblEmployee emp = db.TblEmployee.Find(id);
db.TblEmployee.Remove(emp);
db.SaveChanges();
return 1;
}
catch
{
throw;
}
}
//To Get the list of Cities
public List<TblCities> GetCities()
{
List<TblCities> lstCity = new List<TblCities>();
lstCity = (from CityList in db.TblCities select CityList).ToList();
return lstCity;
}
}
}
Now, we will proceed to create our Web API Controller.
Adding the Web API Controller to the Application
Right click on Controllers folder and select Add >> New Item.
An “Add New Item” dialog box will open. Select ASP.NET from the left panel, then select “API Controller Class” from the templates panel and set the name as EmployeeController.cs. Press OK.
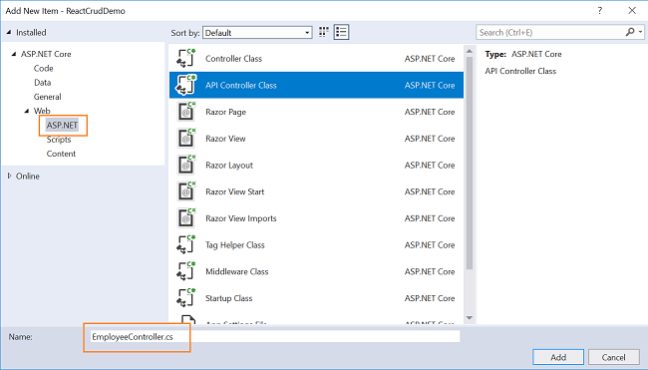
This will create our Web API EmployeeController class. We will put all our business logic in this controller. We will call the methods of EmployeeDataAccessLayer to fetch data and pass on the data to the front-end.
Open the EmployeeController.cs file and put the following code into it.
using System;
using System.Collections.Generic;
using System.Linq;
using System.Threading.Tasks;
using Microsoft.AspNetCore.Mvc;
using ReactCrudDemo.Models;
namespace ReactCrudDemo.Controllers
{
public class EmployeeController : Controller
{
EmployeeDataAccessLayer objemployee = new EmployeeDataAccessLayer();
[HttpGet]
[Route("api/Employee/Index")]
public IEnumerable<TblEmployee> Index()
{
return objemployee.GetAllEmployees();
}
[HttpPost]
[Route("api/Employee/Create")]
public int Create(TblEmployee employee)
{
return objemployee.AddEmployee(employee);
}
[HttpGet]
[Route("api/Employee/Details/{id}")]
public TblEmployee Details(int id)
{
return objemployee.GetEmployeeData(id);
}
[HttpPut]
[Route("api/Employee/Edit")]
public int Edit(TblEmployee employee)
{
return objemployee.UpdateEmployee(employee);
}
[HttpDelete]
[Route("api/Employee/Delete/{id}")]
public int Delete(int id)
{
return objemployee.DeleteEmployee(id);
}
[HttpGet]
[Route("api/Employee/GetCityList")]
public IEnumerable<TblCities> Details()
{
return objemployee.GetCities();
}
}
}
We are done with our backend logic. Therefore, we will now proceed to code our front-end using React.js.
Creating React.js Components
We will be adding two React components to our application:
- A
FetchEmployeecomponent - to display all the employee data and delete an existing employee's data. - An
AddEmployeecomponent - to add a new employee's data and edit an existing employee's data.
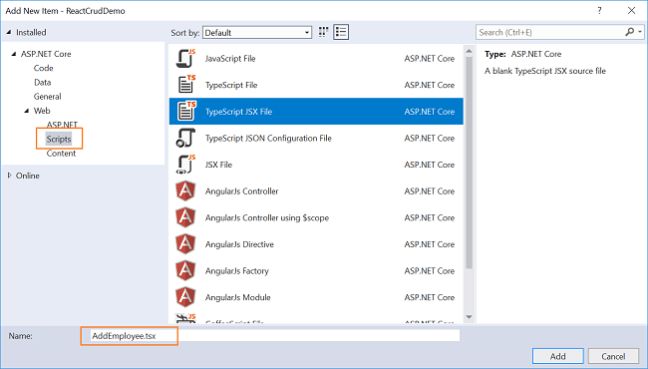
Right-click on ClientApp/components folder and select Add >> New Item. An “Add New Item” dialog box will open. Select Scripts from the left panel, then select “TypeScript JSX File” from the templates panel, and set the name as AddEmployee.tsx. Press OK. This will add a JSX file inside fo the components folder. JSX stand for JavaScript XML. JSX is a preprocessor step that adds XML syntax to JavaScript.
Similarly, add the FetchEmployee.tsx file to the ClientApp/components folder.
Now, our ClientApp folder will have the following structure.
FetchEmployee Component
Open the FetchEmployee.tsx file and put the following code in it.
import * as React from 'react';
import { RouteComponentProps } from 'react-router';import { Link, NavLink } from 'react-router-dom';interface FetchEmployeeDataState {
empList: EmployeeData[];
loading: boolean;
}export class FetchEmployee extends React.Component<RouteComponentProps<{}>, FetchEmployeeDataState> {
constructor() {
super();
this.state = { empList: [], loading: true };
fetch('api/Employee/Index')
.then(response => response.json() as Promise<EmployeeData[]>)
.then(data => {
this.setState({ empList: data, loading: false });
});// This binding is necessary to make "this" work in the callback
this.handleDelete = this.handleDelete.bind(this);
this.handleEdit = this.handleEdit.bind(this);
}
public render() {
let contents = this.state.loading
? <p><em>Loading...</em></p>
: this.renderEmployeeTable(this.state.empList);
return
<div>
<h1>Employee Data</h1>
<p>This component demonstrates fetching Employee data from the server.</p>
<p>
<Link to="/addemployee">Create New</Link>
</p>
{contents}
</div>;
}
// Handle Delete request for an employee
private handleDelete(id: number) {
if (!confirm("Do you want to delete employee with Id: " + id))
return;
else {
fetch('api/Employee/Delete/' + id, {
method: 'delete'}).then(data => {
this.setState(
{
empList: this.state.empList.filter((rec) => {
return (rec.employeeId != id);
})
});
});
}
}private handleEdit(id: number) {
this.props.history.push("/employee/edit/" + id);
}// Returns the HTML table to the render() method.
private renderEmployeeTable(empList: EmployeeData[]) {
return <table className='table'>
<thead>
<tr>
<th></th>
<th>EmployeeId</th>
<th>Name</th>
<th>Gender</th>
<th>Department</th>
<th>City</th>
</tr>
</thead>
<tbody>
{empList.map(emp =>
<tr key={emp.employeeId}>
<td></td>
<td>{emp.employeeId}</td>
<td>{emp.name}</td>
<td>{emp.gender}</td>
<td>{emp.department}</td>
<td>{emp.city}</td>
<td>
<a className="action" onClick={(id) => this.handleEdit(emp.employeeId)}>Edit</a> |<a className="action" onClick={(id) => this.handleDelete(emp.employeeId)}>Delete</a>
</td>
</tr>
)}
</tbody>
</table>;
}
}export class EmployeeData {
employeeId: number = 0;
name: string = "";
gender: string = "";
city: string = "";
department: string = "";
}Let’s understand this code. At the top, we have defined an interface, FetchEmployeeDataState, which has two properties:
empListof typeEmployeeDataclass to hold the employee data.loadingof typebooleanto indicate if the data is being loaded onto the page.
After this, we have defined a component class, FetchEmployee, which inherits the abstract class React.Component. Inside the constructor of this class, we are calling the base class constructor using Super() and then initializing the fields of the interface to their default values.
We are also calling our web API method using fetch and setting the empList value and also setting the loading to false. The fetch method is invoked inside the constructor so that employee data will be displayed as the page loads.
At the end of the constructor, we are binding the handleDelete and handleEdit methods. This binding is necessary to make "this" work in the callback.
Then we have our render() method which will render our HTML elements onto the DOM. We will check if the data has finished loading or not and then call the renderEmployeeTable method which will return an HTML table to display all the employee data on the web page. Every row of the table also has two action methods - Edit and Delete - for editing and deleting the employee records.
Next, we have the handleDelete method which accepts employeeID as a parameter. This will prompt the user with a confirmation box and if the user selects 'yes' then it will delete the employee with this employeeID.
The handleEdit method will invoke an edit request on the employee record by passing the employee id in the URL parameter and redirects it to the AddEmployee component.
At the bottom, we have defined an EmployeeData class that has the same properties as of our TblEmployee Model class to hold the employee data.
AddEmployee Component
Open the AddEmployee.tsx file and put the following code into it:
import * as React from 'react';
import { RouteComponentProps } from 'react-router';
import { Link, NavLink } from 'react-router-dom';
import { EmployeeData } from './FetchEmployee';
interface AddEmployeeDataState {title: string;
loading: boolean;
cityList: Array<any>;
empData: EmployeeData;
}
export class AddEmployee extends React.Component<RouteComponentProps<{}>, AddEmployeeDataState> {
constructor(props) {
super(props);
this.state = { title: "", loading: true, cityList: [], empData: new EmployeeData };
fetch('api/Employee/GetCityList')
.then(response => response.json() as Promise<Array<any>>)
.then(data => {
this.setState({ cityList: data });
});var empid = this.props.match.params["empid"];
// This will set state for Edit employee
if (empid > 0) {
fetch('api/Employee/Details/' + empid)
.then(response => response.json() as Promise<EmployeeData>)
.then(data => {
this.setState({ title: "Edit", loading: false, empData: data });
});
}
// This will set state for Add employee
else {
this.state = { title: "Create", loading: false, cityList: [], empData: new EmployeeData };
}
// This binding is necessary to make "this" work in the callback
this.handleSave = this.handleSave.bind(this);
this.handleCancel = this.handleCancel.bind(this);
}
public render() {let contents = this.state.loading
? <p><em>Loading...</em></p>
: this.renderCreateForm(this.state.cityList);
return <div>
<h1>{this.state.title}</h1>
<h3>Employee</h3>
<hr />
{contents}
</div>;
}
// This will handle the submit form event.
private handleSave(event) {
event.preventDefault();
const data = new FormData(event.target);
// PUT request for Edit employee.
if (this.state.empData.employeeId) {
fetch('api/Employee/Edit', {
method: 'PUT',
body: data,
}).then((response) => response.json())
.then((responseJson) => {
this.props.history.push("/fetchemployee");
})
}
// POST request for Add employee.
else {
fetch('api/Employee/Create', {
method: 'POST',
body: data,
}).then((response) => response.json())
.then((responseJson) => {
this.props.history.push("/fetchemployee");
})
}
}
// This will handle Cancel button click event.
private handleCancel(e) {
e.preventDefault();
this.props.history.push("/fetchemployee");
}
// Returns the HTML Form to the render() method.
private renderCreateForm(cityList: Array<any>) {
return (
<form onSubmit={this.handleSave} ><div className="form-group row" >
<input type="hidden" name="employeeId" value={this.state.empData.employeeId} />
</div>
< div className="form-group row" >
<label className=" control-label col-md-12" htmlFor="Name">Name</label>
<div className="col-md-4">
<input className="form-control" type="text" name="name" defaultValue={this.state.empData.name} required /></div>
</div >
<div className="form-group row">
<label className="control-label col-md-12" htmlFor="Gender">Gender</label>
<div className="col-md-4">
<select className="form-control" data-val="true" name="gender" defaultValue={this.state.empData.gender} required>
<option value="">-- Select Gender --</option>
<option value="Male">Male</option>
<option value="Female">Female</option>
</select>
</div>
</div >
<div className="form-group row">
<label className="control-label col-md-12" htmlFor="Department" >Department</label>
<div className="col-md-4">
<input className="form-control" type="text" name="Department" defaultValue={this.state.empData.department} required />
</div>
</div>
<div className="form-group row">
<label className="control-label col-md-12" htmlFor="City">City</label>
<div className="col-md-4">
<select className="form-control" data-val="true" name="City" defaultValue={this.state.empData.city} required><option value="">-- Select City --</option>
{cityList.map(city =>
<option key={city.cityId} value={city.cityName}>{city.cityName}</option>
)}
</select>
</div>
</div >
<div className="form-group">
<button type="submit" className="btn btn-default">Save</button>
<button className="btn" onClick={this.handleCancel}>Cancel</button>
</div >
</form >
)
}
}
This component will be used for both adding and editing the employee data. Since we will use the EmployeeData class to hold the data, we have imported it from the FetchEmployee component.
The interface, AddEmployeeDataState, has four properties.
- title — to show “Create” or “Edit” on the top of the page.
- loading — to check if the page has finished loading data.
- cityList — to hold the list of cities from tblCities table.
- empData — to hold the employee data to bind it to the HTML form.
Inside the constructor of the component class, AddEmployee, we are initializing the fields of the interface to their default value and then setting the value of the CityList property by fetching the data from the tblCities table. We will use this to bind a dropdown in our HTML form. Since we are fetching the city list inside our constructor, the dropdown list will be populated as the page loads.
This component will handle both Add and Edit requests. So how will the system differentiate between both requests? The answer is routing. We need to define two different route parameters, one for adding an employee record and another for editing an employee record. We will be defining these in the routes.tsx file shortly.
If an edit request is made then the employee id will be passed in the parameter. Inside the constructor, we will read the value of the URL parameter empid. If the value of empid is greater than zero then this is an edit request and we will set the value of the title to "Edit," fill in the data of the empData property, and set loading to false.
If the empid value is not set then it is an add request and we will set the value of title to "Create" and set loading to false.
The handleSave method will handle the save event on the form. Based on whether the URL has an empid parameter or not, we will send a request for PUT or POST and, upon having success, will redirect the user back to the FectchEmployee component.
The renderCreateForm method will return an HTML form to be displayed on the webpage. We have set the default value in all the fields of the Form. If an Add request is made then all the fields will empty. If an edit request is made then it will fill the data of the corresponding employee in the fields. We bind the select element using the cityList property that we have populated in our constructor.
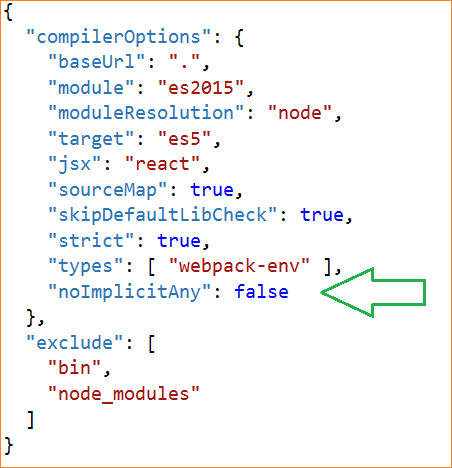
At this point in time, you might get an error, “Parameter ‘props’ implicitly has an ‘any’ type” in the AddEmployee.tsx file.
If you encounter this issue, then add the following line inside the tsconfig.json file.
"noImplicitAny": false
Defining Route and a Navigation Menu for Our Application
Open the ClientApp/routes.tsx file and put the following code into it.
import * as React from 'react';
import { Route } from 'react-router-dom';
import { Layout } from './components/Layout';
import { Home } from './components/Home';
import { FetchEmployee } from './components/FetchEmployee';
import { AddEmployee } from './components/AddEmployee';
export const routes = <Layout>
<Route exact path='/' component={Home} />
<Route path='/fetchemployee' component={FetchEmployee} />
<Route path='/addemployee' component={AddEmployee} />
<Route path='/employee/edit/:empid' component={AddEmployee} />
</Layout>;
In this file, we have defined the routes for our application as below.
- / — if base URL is hit then it will redirect to the
Homecomponent. - /fetchemployee — It will redirect to the
FetchEmployeecomponent. - /addemployee — it will redirect to
AddEmployeecomponent to add a new employee record. - /employee/edit/:empid — we are passing the employee id in the parameter. It will redirect to the
AddEmployeecomponent to edit the existing employees' data.
The last thing remaining is to define the navigation menu for our application. Open the ClientApp/components/NavMenu.tsx file and put the following code into it.
import * as React from 'react';
import { Link, NavLink } from 'react-router-dom';
export class NavMenu extends React.Component<{}, {}> {public render() {return <div className='main-nav'>
<div className='navbar navbar-inverse'>
<div className='navbar-header'>
<button type='button' className='navbar-toggle' data-toggle='collapse' data-target='.navbar-collapse'>
<span className='sr-only'>Toggle navigation</span>
<span className='icon-bar'></span>
<span className='icon-bar'></span>
<span className='icon-bar'></span>
</button>
<Link className='navbar-brand' to={'/'}>ReactCrudDemo</Link></div>
<div className='clearfix'></div>
<div className='navbar-collapse collapse'>
<ul className='nav navbar-nav'>
<li>
<NavLink to={'/'} exact activeClassName='active'>
<span className='glyphicon glyphicon-home'></span> Home
</NavLink>
</li>
<li>
<NavLink to={'/fetchemployee'} activeClassName='active'>
<span className='glyphicon glyphicon-th-list'></span> Fetch employee
</NavLink>
</li>
</ul>
</div>
</div>
</div>;
}
}
And that’s it. We have created our ASP.NET Core application using React.js and the Entity Framework Core database first approach.
Execution Demo
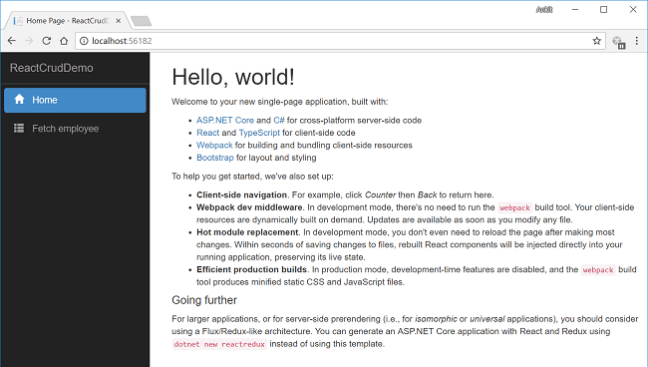
Press F5 to launch the application.
A web page will open as shown in the image below. Notice the navigation menu on the left showing navigation link for the Home and Fetch Employee pages.
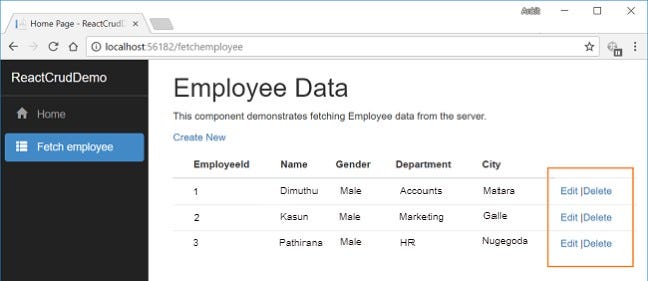
Click on Fetch Employee in the navigation menu. It will redirect you to the FetchEmployee component and display all the employee data on the page. Notice the URL has "/fetchemployee" appended to it as we have defined in our routes.tsx file.
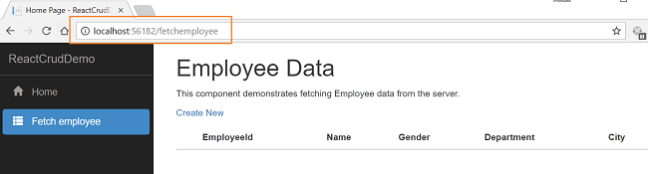
Since we have not added any data, hence it is empty.
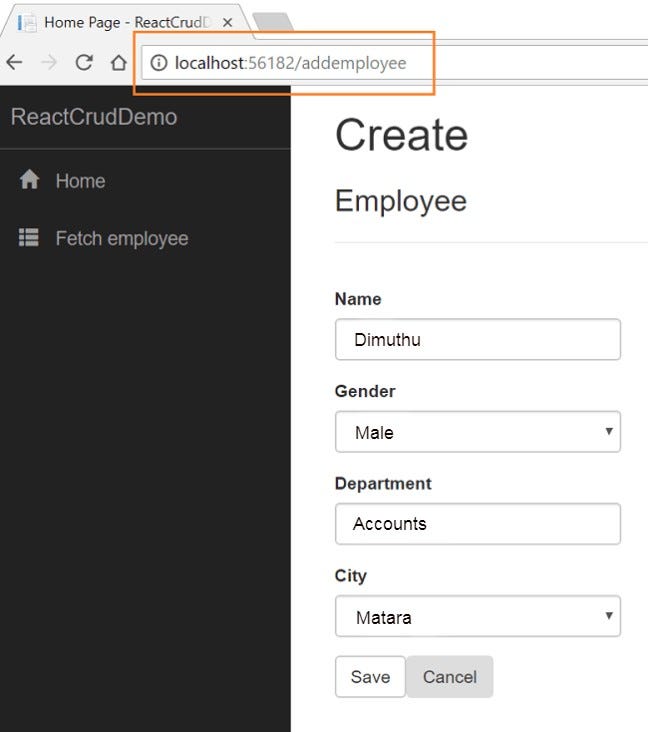
Click on CreateNew to navigate to the /addemployee page. Add a new Employee record as shown in the image below. You can observe that the City field is a dropdown list, containing all the city names that we have inserted into the tblCities table.
After inserting the data in all the fields, click on “Save” button. The new employee record will be created and you will be redirected to the /fetchemployee page, displaying records of all the employees. Here, we can also see action methods Edit and Delete.
If we want to edit an existing employee record, then click the Edit action link. It will open the Edit page as shown below where we can change the employee data. Notice that we have passed employee id in the URL parameter.
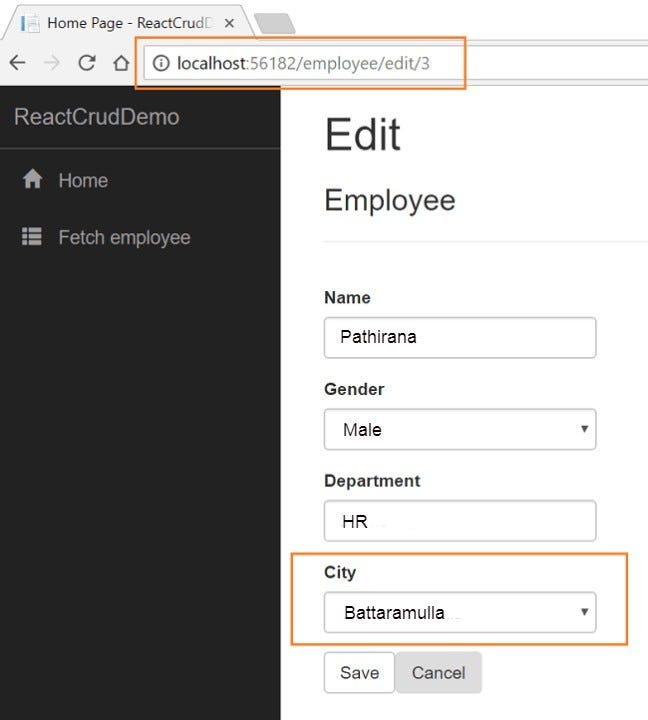
Here, we have changed the City of the employee Pathirana from Nugegoda to Battaramulla. Click on “Save” to return to the fetch-employee page to see the updated changes.
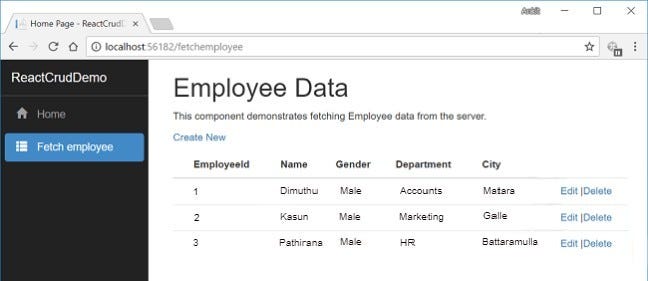
Now, we will perform the Delete operation on an employee named Kasun that has the Employee ID 2. Click on the Delete action link. It will open a JavaScript confirmation box asking for a confirmation to delete.
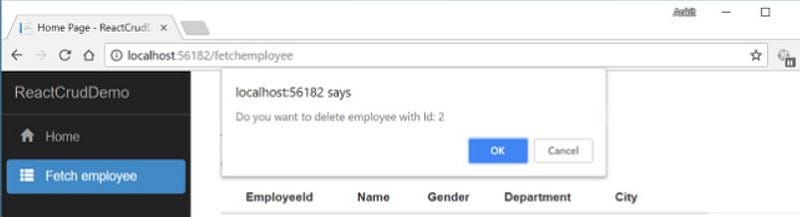
Once we click on “OK” the employee with the name Kasun will be removed from our record and you can see the updated list.
Conclusion
We have successfully created an ASP.NET Core application using React.js and the Entity Framework Core database first approach with the help of Visual Studio 2017 and SQL Server 2014. We have used HTML forms to get data from the user and bind the drop-down list to the database table using the Entity framework.
Fork this application on GitHub and let me know your valuable feedback in the Responses section below.
You can check my other article on ASP .NET here.