Golang & Angular Series — Part 2: Developing and Securing Angular Apps
Golang & Angular Series — Part 2: Developing and Securing Angular Apps
Prerequisites
For this tutorial, you will need to install Golang, Node.js, and Angular. However, as you will see, the process is quite simple. For starters, you can visit the official installation instructions provided by Golang to install the programming language.
After that, you will need to install Node.js (which comes with NPM). For that, you can follow the instructions described here.
Then, after installing Node.js and NPM, you can issue the following command to install the Angular CLI tool:
npm install -g @angular/cliNote: By adding-gin the command above, you make NPM install the Angular CLI tool globally. That is, after issuing this command, you will have thengcommand in all new sessions of your terminal.
Part 1: The Golang Backend Recap
In the first part of this series — Part 1 — The Backend — Developing and Securing Golang APIs — you have developed a secure backend API with Golang and Gin. If you have followed the previous article, you can jump to the next section. Otherwise, you can still follow this article along. after that, you will have to sign up for a free Auth0 account here so you can properly configure and run your backend API.
After signing up for Auth0, you will have to go to your Auth0 dashboard and proceed as follows:
- go to the APIs section;
- Click on Create API;
- define a Name for your API (e.g., “Golang API”);
- define an Identifier for it (e.g.,
https://my-golang-api); - and click on the Create button (leave the Signing Algorithm with RS256).

Then, to run your API, you will have to issue the following commands:
# set env variables
export AUTH0_API_IDENTIFIER=<YOUR_AUTH0_API>
export AUTH0_DOMAIN=<YOUR_AUTH0_TENANT>.auth0.com
go run main.goNote: You will have to replace<YOUR_AUTH0_API>with the identifier you set in your Auth0 API while creating it. Also, you will have to replace<YOUR_AUTH0_TENANT>with the subdomain you chose while creating your Auth0 account.
Developing a To-Do List Application with Angular
Now that you have your backend sorted out, you will proceed with the creation of the front-end app with Angular. This application will consist of a simple home page with a button to redirect users to the to-do list. To access this list, users will have to be authenticated.
Initializing the Angular Project
For a starter, you will have to scaffold your new Angular project. You will do this in a new directory called ui inside the project root of your Golang. To create this directory and to scaffold your Angular application, you will use the Angular CLI tool. So, head to the project root of your Golang API and issue the following command:
# make sure you are on your backend project root
ng new ui
This will place a new Angular quick-start project inside the ui directory. Now, you need to go into this new directory and download all your project's dependencies. To do this, run the following commands:
# move into the ui directory
cd ui
# install all dependencies
npm installThe last command issued will look at the package.json file and see what are the dependencies defined there so it can download everything.
Then, another thing you will need to do before start writing your application is to add CDN links to Bootstrap and Font Awesome. These libraries (or UI frameworks) will help your application look a little bit better without the need of investing too much time on CSS files and icons. So, open the ./ui/src/index.html file and replace its contents with this:
<!doctype html>
<html lang="en">
<head>
<meta charset="utf-8">
<title>Auth0 Golang Example</title>
<base href="/">
<meta name="viewport" content="width=device-width, initial-scale=1"><link rel="icon" type="image/x-icon" href="favicon.ico">
<link rel="stylesheet" href="https://stackpath.bootstrapcdn.com/bootstrap/4.1.1/css/bootstrap.min.css">
<link rel="stylesheet" href="https://use.fontawesome.com/releases/v5.1.0/css/all.css"></head>
<body>
<app-root></app-root>
</body>
</html>
Then, the last change that you will have to do is to edit the environment files found inside the ./ui/src/environments directory. These files will act as global variables for your application and distinguish between whether you are running a local development environment or if you are running in production.
So, first, you will open the environment.prod.ts file and replace its content with this:
export const environment = {
production: true,
gateway: '',
callback: 'http://localhost:4200/callback',
domain: '<YOUR_AUTH0_TENANT>.auth0.com',
clientId: '<YOUR_AUTH0_APPLICATION_CLIENT_ID>',
audience: '<YOUR_AUTH0_API_IDENTIFIER>'
};
Then, as you will spend most of your time developing, you will have to open the environment.ts file (which is considered the config for your development environment by default) and replace its contents with this:
export const environment = {
production: false,
gateway: 'http://localhost:3000',
callback: 'http://localhost:4200/callback',
domain: '<YOUR_AUTH0_TENANT>.auth0.com',
clientId: '<YOUR_AUTH0_APPLICATION_CLIENT_ID>',
audience: '<YOUR_AUTH0_API_IDENTIFIER>'
};
Now, as you already created your Auth0 API in the last part of this series, you can replace <YOUR_AUTH0_API_IDENTIFIER> in both files (for example, you can replace this placeholder with https://my-golang-api). In the next section, you will create an Auth0 Application and then you will be able to replace the other placeholders used above with your own Auth0 values.
Creating an Auth0 Application
Now that you have scaffolded your Angular application, you will need to register it at Auth0 so you can properly offer authentication and authorization features to your users. So, head to the Applications section of your Auth0 dashboard and hit the Create Application button. When Auth0 shows you the form to create your Application, fill in the following information:
- Name: You can name your application with anything that might help you identify it in the future. For example, “To-Do Angular App”.
- Application Type: For this one, you will have to choose the Single Page Web Applications option, as this is exactly what you are going to create.
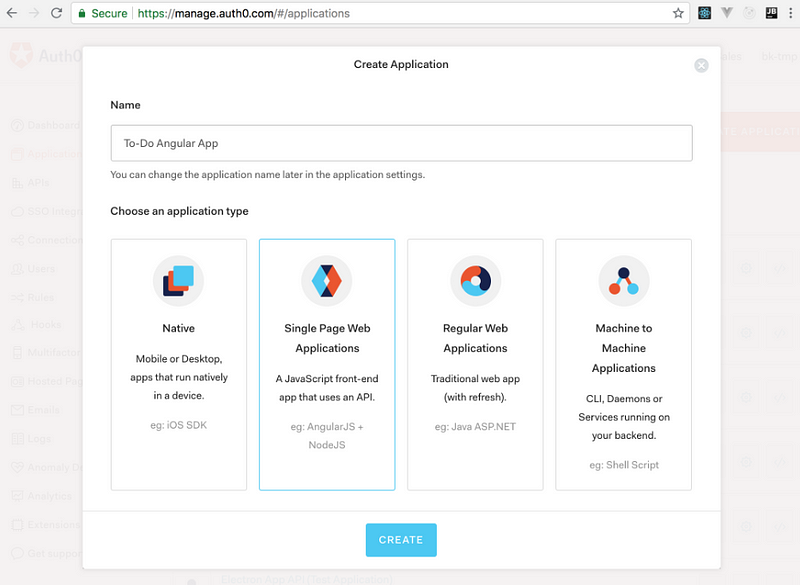
Then, when you hit the Create button, Auth0 will redirect you to the Quick Start section of your new application. From there, you will have to move to the Settings section so you can finish configuring your application.
So, now that you are in the Settings section, search for the Allowed Callback URLs field and insert http://localhost:4200/callback there. You need this configuration because, after the authentication process, Auth0 will only redirect users to the URLs listed in this field (this is a security measure that Auth0 puts in place). After that, you can hit Save to persist the change and leave this page open. You will copy values from it in a moment.
Now, back into your project, open both the environment.prod.ts and environment.ts files and replace the placeholders as follows:
<YOUR_AUTH0_TENANT>: In the place of this placeholder, you will have to insert the Auth0 subdomain you chose while creating your account. In the end, you will have something similar todomain: 'pungyeon.auth0.com'.<YOUR_AUTH0_APPLICATION_CLIENT_ID>: In the place of this placeholder, you will have to insert the value that Auth0 shows in the Client ID field of your new application. This will be a random string similar toz4Z09pinlP93aqTVaIBkCzzQ9vjZ6eEX.
Note: You have to make sure you replace both placeholders on both files. Otherwise, you might end up with a buggy sign-in feature.
Creating the Welcome Component
Ok, after configuring the environments of your Angular app, you are ready to start developing it. So, for starters, you will make a new Angular component to show the home page of your app. To do so, you will use Angular CLI one more time:
# make sure you are executing this from the ui directory
ng g c home
Note: The command above is the shortened version of ng generate component home.This command will create a new directory insideapp, named home, and it will place four files in it:
home.component.css: This is the CSS file that will allow you to style your new component.home.component.html- This is the HTML representation of your new component.home.component.spec.ts- This is where you would write automated tests for your component.home.component.ts- This is the main piece of your component.
Note: The CLI will also automatically add this newly created class to ourapp.module.ts, in the@NgModule.declarationssection.
To keep things simple, your home page will be extremely simple. Actually, the only file you will have to change is the home.component.html one. So, open it and replace its content with this:
<div class="c-block">
  <h2>Welcome Home!</h2>
  <a class="btn btn-primary" routerLink="/todo">Show Todo List</a>
</div>
In this case, all you are doing is creating a title and a link that will redirect users to the /todo route. You haven't determined the routing yet, so that won't work right now. You will get to that soon.
Creating the To-Do Component
After creating the home page, you can focus on creating the component that will provide the to-do list functionality. So, the first step here will be using Angular CLI to create the component:
# make sure you are executing this from the ui directory
ng g c todo
For this article, you will split the to-do functionality into two things: a component (the one you just created) and a service. The service will be in charge of issuing HTTP requests to your Golang backend API. After creating this service, your component will be able to use it to communicate with your backend so it can display the correct information retrieved by the service.
So, to create your service, issue the following command:
# make sure you are executing this from the ui directory
ng g s todo
Then, open the todo.service.ts file and replace its content with this:
import { Injectable } from '@angular/core';
import { HttpClient } from '@angular/common/http';
import { environment } from '../environments/environment';
@Injectable()
export class TodoService {
constructor(private httpClient: HttpClient) {}getTodoList() {
return this.httpClient.get(environment.gateway + '/todo');
}addTodo(todo: Todo) {
return this.httpClient.post(environment.gateway + '/todo', todo);
}completeTodo(todo: Todo) {
return this.httpClient.put(environment.gateway + '/todo', todo);
}deleteTodo(todo: Todo) {
return this.httpClient.delete(environment.gateway + '/todo/' + todo.id);
}
}export class Todo {
id: string;
message: string;
complete: boolean;}
In the new version of this file, you are stating that you want to export your TodoService class, thereby making it available for other components to use. On the initialization of this class, you are defining that it needs an instance of HttpClient. Then, you are defining four methods to issue HTTP requests to your backend API: getTodoList, addTodo, completeTodo, and deleteTodo.
Note: The@Injectable()decorator ensures this class is available toInjectorfor creation.
Also, at the bottom of the file, you are exporting a class called Todo, which is a mirror of the todo structure you used in the backend. You use this class throughout your project to ensure a more accurate description in code of what you are sending and receiving from your backend.
One important thing to notice in this service is that you are using the environment.gateway variable to determine where your HTTP calls are headed. This makes running the same code base in different environments easier.
Now, to take your new service out for a spin, you can open the todo.component.ts file and replace its code with this:
import { Component, OnInit } from '@angular/core';
import { TodoService, Todo } from '../todo.service';
@Component({
selector: 'app-todo',
templateUrl: './todo.component.html',
styleUrls: ['./todo.component.css']
})export class TodoComponent implements OnInit {activeTodos: Todo[];
completedTodos: Todo[];
todoMessage: string;
constructor(private todoService: TodoService) { }ngOnInit() {
this.getAll();
}getAll() {
this.todoService.getTodoList().subscribe((data: Todo[]) => {
this.activeTodos = data.filter((a) => !a.complete);
this.completedTodos = data.filter((a) => a.complete);
});}
addTodo() {
var newTodo : Todo = {
message: this.todoMessage,
id: '',
complete: false
};
this.todoService.addTodo(newTodo).subscribe(() => {
this.getAll();
this.todoMessage = '';
});
}
completeTodo(todo: Todo) {
this.todoService.completeTodo(todo).subscribe(() => {
this.getAll();
});
}
deleteTodo(todo: Todo) {
this.todoService.deleteTodo(todo).subscribe(() => {
this.getAll();
})
}
}
Starting from the export class TodoComponent, what you have is three properties that respectively contain your activeTodos list, your completedTodos list, and a todoMessage that will hold data inputted by users. Then, you have the constructor of your component, which is expecting a TodoService instance and that stores it as a private property called todoService.
Then, the first function of your component, ngOnInit, is a built-in standard of Angular and derives from the interface OnInit. Essentially, the implementation of the OnInit interface will wait for the component to be loaded before executing the ngOnInit function. Then, ngOnInit will retrieve data from your backend with the help of the getAll method. This method, will invoke the todoService.getTodoList function. As you know, this function is an HTTP call to your backend to get all of your todo items.
The HttpClient in Angular does not return with the response but, rather, with an Observable. Essentially, this is an object that you can 'subscribe' so, whenever new data is retrieved, you get notified and can act in some way or another. In this scenario, you are using the observable more like a callback, but it's strongly recommended reading up on RxJs and Observables. They are super useful in modern JavaScript.
So, the getAll function subscribes to data from the todoService.getTodoList and, whenever data is received, it assigns all active todos to your activeTodos property (by filtering out any complete items) and do the opposite for the completedTodos property.
The rest of your class methods are corresponding to your TodoService, which in turn was mapped up against your backend API. In other words, you have functions to add, complete, delete, and update your to-do lists.
Now that your TypeScript logic is done, you can open the todo.component.html file and replace its contents with this:
<h2>Todos</h2>
<table class="table">
<thead>
<tr>
<th>ID</th>
<th>Description</th>
<th>Complete</th>
</tr>
</thead>
<tbody>
<tr *ngFor="let todo of activeTodos">
<td>{{todo.id}}</td>
<td>{{todo.message}}</td>
<td>
<button *ngIf="!todo.complete" class="btn btn-secondary" (click)="completeTodo(todo)">
<i class="fa fa-check"></i>
</button>
<button *ngIf="todo.complete" class="btn btn-success" disabled>
<i class="fa fa-check"></i>
</button>
<button class="btn btn-danger" (click)="deleteTodo(todo)">
<i class="fa fa-trash"></i>
</button>
</td>
</tr>
</tbody>
</table>
<h3>Completed</h3>
<table class="table">
<thead>
<tr>
<th>ID</th>
<th>Description</th>
<th>Complete</th>
</tr>
</thead>
<tbody>
<tr *ngFor="let todo of completedTodos">
<td>{{todo.id}}</td>
<td>{{todo.message}}</td>
<td>
<button *ngIf="!todo.complete" class="btn btn-secondary" (click)="completeTodo(todo)">
<i class="fa fa-check"></i>
</button>
<button *ngIf="todo.complete" class="btn btn-success" disabled>
<i class="fa fa-check"></i>
</button>
<button class="btn btn-danger" (click)="deleteTodo(todo)">
<i class="fa fa-trash"></i>
</button>
</td>
</tr>
</tbody>
</table>
<input placeholder="description..." [(ngModel)]="todoMessage"><button class="btn btn-primary" (click)="addTodo()">Add</button>
Basically, your to-do page consists of two tables that use the *ngFor directive to iterate over all the to-do items in activeTodos and completedTodos. These tables contain the id and message of the to-do items, as well as two buttons that allow users to complete and delete items. Also, this page indicates whether the to-do items are completed or not. This happens in the usage of *ngIf directives. If the todo.complete property is false, this page shows an active green button and, if the todo is already completed, it shows a grey disabled button.
At the very bottom of this HTML page, you have an input text and a button that, when clicked, triggers the addTodo function. This is what gives your users the possibility of adding new to-do items. The input content is mapped to the todoMessage property via the ngModel directive. This directive works like a two-way data binding, meaning that the property is tied to the input element and the element is tied to the variable. In other words, should one change so will the other?
Then, to have a component that looks good, you can open the todo.component.css and insert the following code:
button {width: auto;
margin: 5px;
}
td {
vertical-align: unset;
}
If you were to spin up your project now, none of your hard work would show. That happens because you are not routing your clients anyway and, even if you were, they are not authenticated to get the to-do list from your backend. In the next section, you address both issues.
Setting up Routing and Securing Angular with Auth0
For starters, you will have to install auth0-js as a dependency to your project:
# from the ui directory, run:
npm install --save auth0-js
Then, you will have to create a service to handle the authentication process. To do this, use Angular CLI as follows:
ng g s authNow that you have your AuthService created, open its file (auth.service.ts) and replace its code with this:
import { Injectable } from '@angular/core';
import { environment } from 'src/environments/environment';
import { Router } from '@angular/router';
import * as auth0 from 'auth0-js';
(window as any).global = window;
@Injectable()
export class AuthService {
constructor(public router: Router)  {}
access_token: string;
id_token: string;
expires_at: string;
auth0 = new auth0.WebAuth({
clientID: environment.clientId,
domain: environment.domain,
responseType: 'token id_token',
audience: environment.audience,
redirectUri: environment.callback,
scope: 'openid'
});
public login(): void {
this.auth0.authorize();}
public handleAuthentication(): void {
this.auth0.parseHash((err, authResult) => {
if (err) console.log(err);
if (!err && authResult && authResult.accessToken && authResult.idToken) {
window.location.hash = '';
this.setSession(authResult);
}
this.router.navigate(['/home']);
});
}
private setSession(authResult): void {
// Set the time that the Access Token will expire at
const expiresAt = JSON.stringify((authResult.expiresIn * 1000) + new Date().getTime());
this.access_token = authResult.accessToken;
this.id_token = authResult.idToken;
this.expires_at = expiresAt;
}
public logout(): void {this.access_token = null;
this.id_token = null;
this.expires_at = null;
// Go back to the home route
this.router.navigate(['/']);
}
public isAuthenticated(): boolean {// Check whether the current time is past the
// Access Token's expiry time
const expiresAt = JSON.parse(this.expires_at || '{}');
return new Date().getTime() < expiresAt;
}
public createAuthHeaderValue(): string {
return 'Bearer ' + this.access_token;
}
}
As you can see, you have the familiar @Injectable() decorator that makes this service injectable into other components. Then, you define three string properties and a single auth0.WebAuth object. This object is what is used for authenticating against Auth0. As such, you will need to use the information from your environment files with this object to send your users to Auth0 and to inform which application they are trying to get access to.
Your login function is quite simple looking but, essentially, this will initialize the authentication process on Auth0. If the user is authenticated, Auth0 will send them to the specified callback location with a tailing hash on the URL. Then, auth0-js will parse this hash with the parseHash function. If everything goes ok, your code will call the setSession function which will set three properties with the appropriate values: access_token, id_token, and expires_at.
The lougout function resets all tokens from memory and the isAuthenticated method just returns whether the token has expired or not. You will use this information later while getting an authentication status of your user.
Lastly, you have the createAuthHeaderValue function, which returns a string in the form of an Authorization bearer header.
Now you need to create the callback component, which will be done like the other components:
# from the ui directory
ng g c callback
After creating it, change the content of the callback.component.ts file with this:
import { Component, OnInit } from '@angular/core';
import { AuthService } from '../auth.service';
@Component({
selector: 'app-callback',
templateUrl: './callback.component.html',
styleUrls: ['./callback.component.css']
})
export class CallbackComponent implements OnInit {
constructor(private auth: AuthService) { }
ngOnInit() {
this.auth.handleAuthentication();
}}
All you are doing here is to invoke the handleAuthentication method of your authentication service once the component is initialized. As you learned, this function parses the URL hash and redirects users to the /home route.
Once you have set your authentication session with your callback component, you will need to make sure that all future requests include the token retrieved from Auth0 in the Authorization header. To do this, you will create an Angular interceptor.
So, create a new file called token.interceptor.ts under the ./src/app/ directory and insert the following code into it:
import { Injectable } from '@angular/core';
import { HttpInterceptor, HttpRequest, HttpHandler, HttpEvent } from '@angular/common/http';
import { AuthService } from './auth.service';
import { Observable } from 'rxjs/internal/Observable';
@Injectable()
export class TokenInterceptor implements HttpInterceptor {
constructor(public auth: AuthService) {}intercept(request: HttpRequest<any>, next: HttpHandler): Observable<HttpEvent<any>> {
request = request.clone({
setHeaders: {
Authorization: this.auth.createAuthHeaderValue()
}
});
return next.handle(request);
}
}This interceptor service intercepts (of course) all of the outgoing HTTP requests and add an authentication header if a token is available. To do this, this interceptor implements HttpInterceptor, which has the constraint of needing the intercept function. This function is then invoked upon an HTTP request.
Much like the middleware in your backend, this will return a next.handle, which basically forwards the modified request to the original destination. The intercept function, in this case, is quite simple. You are cloning the incoming request to add an Authorization header. Remember, if no token is found, nothing is added. Once the request has been altered, this interceptor invokes the next.handle passing the modified request.
The reason why you are creating this interceptor is to ensure that all of your requests contain the appropriate Authorization header. Centralizing the header management like this makes it easier in the future. If changes are made to authentication or if new requests are added to the project, no changes are needed.
To include this in your app.module.ts file, you will need to add the following object to the providers array:
// ... other imports ...
import {HTTP_INTERCEPTORS} from '@angular/common/http';
import {TokenInterceptor} from './token.interceptor';
@NgModule({
// ... declarations and imports ...
providers: [{
provide: HTTP_INTERCEPTORS,
useClass: TokenInterceptor,
multi: true
}],
// ... bootstrap ...
})
export class AppModule { }
Almost there! Now, you need to change your app.component.ts page to include routing and actually define your routes. You can start by creating the routes. So, create a new file called app-routing.module.ts inside ./src/app and insert the following code into it:
import { HomeComponent } from './home/home.component';
import { RouterModule, Routes } from "@angular/router";
import { NgModule } from '@angular/core';
import { AuthGuardService } from './auth-guard.service';
import { CallbackComponent } from './callback/callback.component';
import { TodoComponent } from './todo/todo.component';
const routes: Routes = [
{ path: '', redirectTo: 'home', pathMatch: 'full' },
{ path: 'home', component: HomeComponent },
{ path: 'todo', component: TodoComponent, canActivate: [AuthGuardService] },
{ path: 'callback', component: CallbackComponent }
];
@NgModule({
imports: [ RouterModule.forRoot(routes) ],
exports: [ RouterModule ]
})
export class AppRoutingModule { }The only important aspect of this file is your routes constant. This constant defines an array of paths. The root ('') path will redirect to your HomeComponent, the todo path will redirect to the TodoComponent, and callback to the CallbackComponent. However, as you will notice, the todo path is slightly different in that it is using the canActivate property and using AuthGuardService. Well... you haven't written the AuthGuardService yet. So, you can do that right away.
The canActivate property basically asks a service (which implements CanActivate) for a boolean response of whether or not a user is able to activate this page. To create this service, execute the following command:
# from the ui directory
ng g s auth-guard
Then, open the auth-guard.service.ts file and replace its code with this:
import { CanActivate, Router } from '@angular/router';
import { Injectable } from '@angular/core';
import { AuthService } from './auth.service';
@Injectable()
export class AuthGuardService implements CanActivate {
constructor(private auth: AuthService, private router: Router) {}
canActivate(): boolean {
if (this.auth.isAuthenticated()) {
return true;
}
this.auth.login()
}
}
This is actually a really simple service. This service simply calls the AuthService asking whether the current user is authenticated or not. If the user is authenticated, it returns true, forwarding the user to the requested route. If not, it will invoke the auth.login function, which will send your user to the Auth0 login page.
Now, to make sure all components, services, interceptors, and routers are included in your app, open the app.module.ts file and update it as follows:
import { BrowserModule } from '@angular/platform-browser';
import { NgModule } from '@angular/core';
import { AppRoutingModule } from './app-routing.module';
import { HttpClientModule, HTTP_INTERCEPTORS } from '@angular/common/http';
import { AppComponent } from './app.component';
import { HomeComponent } from './home/home.component';
import { AuthGuardService } from './auth-guard.service';
import { AuthService } from './auth.service';
import { CallbackComponent } from './callback/callback.component';
import { TodoComponent } from './todo/todo.component';
import { TodoService } from './todo.service';
import { FormsModule } from '@angular/forms';
import { TokenInterceptor } from './token.interceptor';
@NgModule({
declarations: [
AppComponent,
HomeComponent,
CallbackComponent,
TodoComponent
],
imports: [
AppRoutingModule,
BrowserModule,
FormsModule,
HttpClientModule
],
providers: [AuthGuardService, AuthService, TodoService, {
provide: HTTP_INTERCEPTORS,
useClass: TokenInterceptor,
multi: true
}],bootstrap: [AppComponent]
})
export class AppModule { }For the routing, as you can see, you have imported the AppRoutingModule class. So, now you can finally include this routing to your application, which will be the last part of this tutorial.
Putting it all together
So, it’s been a long while, but now you are finally going to add routing to your Angular application. Also, you will create a little menu bar for navigation and to allow users to log out. First, you need to edit the app.component.ts file to add AuthService to it:
import { Component } from '@angular/core';
import { AuthService } from './auth.service';
@Component({
selector: 'app-root',
templateUrl: './app.component.html',
styleUrls: ['./app.component.css']
})export class AppComponent {
constructor(public auth: AuthService) {}
}Next, you need to edit the app.component.html file and set it with the following code:
<nav class="navbar navbar-default">
<div class="container-fluid">
<div class="navbar-header">
<a class="navbar-brand" href="#">Auth0 - Angular</a>
<button
class="btn btn-light btn-margin"
routerLink="/">
Home
</button>
<button
class="btn btn-light btn-margin"
*ngIf="!auth.isAuthenticated()"
(click)="auth.login()">
Log In
</button>
<button
class="btn btn-light btn-margin "
*ngIf="auth.isAuthenticated()"
(click)="auth.logout()">
Log Out
</button>
</div>
</div>
</nav>
<div class="container-fluid">
<div class="row">
<div class="col-sm">
<router-outlet></router-outlet>
</div>
</div>
</div>
Here, you are creating a new navigation bar including functions from AuthService to allow users to log in and log out. Underneath this navigation bar, you are including the router-outlet component inside a div.container-fluid element (this is part of Bootstrap). The outlet element is what tells Angular to ask to the routing module which page it should load.
It’s a very common practice to include the navigation bar together with the routing component. This ensures that the menu is present on all of your pages, without having to reload the navigation bar for each individual page.
The final touch to your Angular project will be adding some style to it. So, open the styles.css file and insert the following CSS rules:
.c-block {
width: 50%;
margin-left: 50%;
transform: translateX(-50%);
text-align: center;
}
button {
margin: 5px;
border-radius: 5px;
width: 200px;
}img {
margin: 20px;
}
h3 {
margin-top: 30px;
}Finally, you are done developing your Angular project! Your to-do list is now ready for prime time. So, to test your Angular app, go to your terminal, and run this:
# from the ui directory
ng serve
Then, open a new terminal window and go to the project root. There, you will just need to tweak one more configuration. As you backend runs on a different “domain” (http://localhost:3000) then your Angular app (http://localhost:4200) you will have to enable Cross-Origin Resource Sharing (CORS) in your Golang backend API.
To do this, you will have to update the main.go file as follows:
// ... package definition, import statements, and var definitions ...
func main() {
setAuth0Variables()
r := gin.Default()
r.Use(CORSMiddleware())
// ... the rest of the function ...
}
// ... setAuth0Variables, authRequired, terminateWithError functions ...
func CORSMiddleware() gin.HandlerFunc {
return func(c *gin.Context) {
c.Writer.Header().Set("Access-Control-Allow-Origin", "*")
c.Writer.Header().Set("Access-Control-Allow-Headers", "Content-Type, Content-Length, Accept-Encoding, X-CSRF-Token, Authorization, accept, origin, Cache-Control, X-Requested-With")
c.Writer.Header().Set("Access-Control-Allow-Methods", "DELETE, GET, OPTIONS, POST, PUT")
if c.Request.Method == "OPTIONS" {
c.AbortWithStatus(204)
return
}
c.Next()
}}
From there, execute the following commands:
# set env variables
export AUTH0_API_IDENTIFIER=<YOUR_AUTH0_API>
export AUTH0_DOMAIN=<YOUR_AUTH0_TENANT>.auth0.com
go run main.goNote: You have to replace<YOUR_AUTH0_API>with the identifier you set in your Auth0 API while creating it. Also, you have to replace<YOUR_AUTH0_TENANT>with the subdomain you chose while creating your Auth0 account.
Now, if you open http://localhost:4200 in a web browser, you will see the following screen:
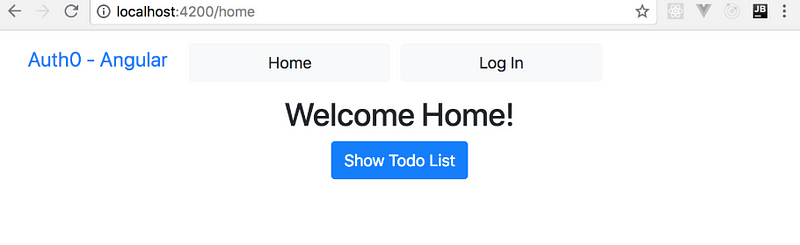
Then, if you click on Log In or on Show Todo List, your app will redirect you to Auth0 so you can authenticate. After authenticating, Auth0 will redirect you back to your app so you can proceed using it.
When properly logged in, you can click on Show Todo List and start using your app.

Conclusion
So, you finally made it! The application that you created was pretty simple. Just a to-do list where you can add, delete, and complete some to-do items. However, the framework around your application is quite sound. You have handled authentication via Auth0, creating a very strong starting point for your application, by starting with security in mind.
Adding features to your application becomes a lot easier once you have established a strong fundament in security. You can add different to-do lists for different users relatively easily without having to worry about how this will affect your application down the road. Using a third-party security solution like Auth0 is also a great advantage because you can rest assured that this solution will keep your application data safe. With a few changes here and there (such as serving our API and static files over HTTPS), you could quite confidently deploy this code to production.
I hope this series has been helpful and that it has given some insight on how easy it is to implement a full-stack application with Golang and Angular. Feedback and questions are very welcome!