Creating A Simple REST Service Using AWS Lambda, API Gateway, And IAM
Creating A Simple REST Service Using AWS Lambda, API Gateway, And IAM
AWS makes it easy to set up a REST service with authentication using Lambda, the AWS API Gateway, and IAM. Using these technologies through AWS doesn’t require hosting cost for the Lambda and API Gateway service and you pay per Lambda call. You also benefit from Lambda auto-scaling depending on the request volume and concurrency.
We’ll use Java in the example below where we create a simple REST service to evaluate if a number is prime or not.
AWS Lambda
Step 1: Create a Lambda Function
This function will implement the Lambda handler function.
import com.amazonaws.services.lambda.runtime.Context;
import com.amazonaws.services.lambda.runtime.LambdaLogger;

public class Hello {

    public String myHandler(int input, Context context) {
        LambdaLogger logger = context.getLogger();
        StringBuilder result = new StringBuilder("");
        result.append("Input Parameter " + input + " is ");

        if(isPrime(input)) {
            result.append("a PRIME");
        } else {
            result.append("NOT a PRIME");
        }
        logger.log(result.toString());
        return result.toString();
    }

    private boolean isPrime(long n) {
        if(n < 2) return false;
        if(n == 2 || n == 3) return true;
        if(n%2 == 0 || n%3 == 0) return false;
        long sqrtN = (long)Math.sqrt(n)+1;
        for(long i = 6L; i <= sqrtN; i += 6) {
            if(n%(i-1) == 0 || n%(i+1) == 0) return false;
        }
        return true;
    }

}
When creating the Lambda function, specify a handler that will be invoked when a Lambda function is triggered. There are 2 invocation methods supported by Lambda: Event and RequestResponse. In our example, we’ll use the RequestResponse invocation method over HTTPS using API Gateway.
In this example, we invoke the myHandler Java function over REST using the API Gateway. The first parameter within that function–(int input)–is the input to the handler sent through the REST service. Even though we are using an int Java data type in this example, the input could be any simple Java type, POJO, or Stream type.
The second parameter — Context context — is a Context object and allows us to interact with the Lambda execution environment. Here we are using it to get the CloudWatch log stream associated with the Lambda function. The private function, isPrime, helps to determine if the input is a prime number or not. The last two lines of the myHandler function outputs the result of the function to CloudWatch and returns that output to the invoker (REST Service) of the myHandler function.
Step 2: Create Deployment Package
Your deployment package can be a .zip file or a standalone .jar. In our example, we will be creating a standalone .jar using the Maven Shade Plugin. You will need to create a Maven pom.xml with the ‘aws-lambda-java-core’ dependency and use the Maven Shade Plugin to build a standalone .jar as shown below. After this, you will need to create a Lambda function through the AWS console.
<dependency>
<groupId>com.amazonaws</groupId>
<artifactId>aws-lambda-java-core</artifactId>
<version>1.1.0</version>
</dependency>


<plugin>
      <groupId>org.apache.maven.plugins</groupId>
      <artifactId>maven-shade-plugin</artifactId>
      <version>2.3</version>
      <configuration>
          <createDependencyReducedPom>false</createDependencyReducedPom>
      </configuration>
      <executions>
          <execution>
              <phase>package</phase>
              <goals>
                  <goal>shade</goal>
              </goals>
          </execution>
      </executions>
</plugin>
Step 3: Create Lambda function through the AWS console
When you package and upload this code to create your Lambda function, you will specify the package.class-name::handler method reference as the handler.
- Sign in to the AWS Management Console, open the AWS Lambda console and choose the region. In our case, we are using US-East Cost (North Virginia).
- Choose Create a Lambda function.
- In Step 1: Select blueprint, choose the hello-world blueprint or skip this step.
- In Step 2: Configure function, specify the following values.
- Enter a function name (in our case, PRIMELAMBDA).
- Select Java 8 from the Runtime list. Choose Upload a .ZIP file, click Upload and then choose the .jar (or .zip file) you created.
Note: you can also upload the .jar or .zip file to an S3 bucket, and provide the S3 bucket name and object key. - In Handler, specify package.class-name::handler (in our case, example.Hello::myHandler).
- For the IAM Role, create a role that allows you to write to CloudWatch logs.
- Make sure you create an inline policy using IAM given below and assign that policy to the IAM role.
{
    "Version": "2020-04-19",
    "Statement": [
        {
            "Effect": "Allow",
            "Action": [
                "logs:*"
            ],
            "Resource": "arn:aws:logs:*:*:*"
        }
    ]
}
10. For Memory, specify 512 (or the amount of memory you need).
11. For Timeout, specify 15 seconds (or the response timeout right for you).
Now, let’s create an REST service to invoke this Lambda function using API Gateway.
API Gateway
Prerequisites
You must have assigned API Gateway access permission (like AmazonAPIGatewayInvokeFullAccess) to an IAM user. The IAM user also needs full access to work with Lambda (AWSLambdaBasicExecutionRole or AWSLambdaFullAccess).
Step 1: Create an API
- Sign in to the API Gateway console at https://console.aws.amazon.com/apigateway.
- Click on Create API button.
- For API name, type a name for your new API (for example, PrimeNumberAPI)
- In the Clone from API section, select Do not clone from existing API.
- Choose Create API.
Step 2: Create a Resource
- In the API Gateway console, choose the resource root (/), and then choose Create Resource.
- For Resource Name, type a name for your new resource (for example, PRIME).
- For Resource Path, leave the default value of /prime.
- Choose Create Resource.
Step 3: Create and Test the POST Method
- In the Resources pane, choose / prime, and then choose Create Method.
- For the HTTP method, choose POST. Then choose the checkmark button to save your choice.
- In the Setup pane for Integration Type, choose Lambda Function.
- For Lambda Region, choose the region identifier that corresponds to the region name in which you created the PRIMELAMBDA Lambda function.
- For Lambda Function, type PRIMELAMBDA, and then choose Save.
- When you are prompted to give API Gateway permission to invoke your Lambda function, choose Ok.
- In the Method Execution pane, in the Client box, choose TEST. Expand Request Body, and pass any integer number (like 1234).
- Click Test. If successful, the Response Body will display the following:
“Input Parameter 1234 is NOT a PRIME”
Step 4: Deploy the API
- In the Resources pane, choose Deploy API.
- For Deployment stage, choose New Stage.
- For Stage name, type production.
- For Stage description, type Prime Number Test.
- For Deployment description, type Calling Lambda functions.
- Choose Deploy.
Step 5: Test the API
In any rest API client, test this API by passing the Invoke URL and integer number as a parameter within the REST request body.
https://my-api-id.execute-api.region-id.amazonaws.com/production/prime
Now that we have created REST service using API Gateway, let's figure out how to set up an authentication mechanism using IAM.
Enabling Authentication using IAM
- On the API Gateway console, click on Resources. Go to POST API.
- Click Method Request. In the Authorization type, choose AWS_IAM.
- Click Deploy API.
Now, a user who has the AmazonAPIGatewayInvokeFullAccess policy through IAM can only invoke this REST service. To authenticate, you will need to pass your AWS access key and secret key. Below is a standard AmazonAPIGatewayInvokeFullAccess IAM policy. If you want to further restrict the user to only access a specific API Gateway REST service, update the resource section of the IAM policy to reference the specific resource.
{
  "Version": "2020-04-19",
  "Statement": [
    {
      "Effect": "Allow",
      "Action": [
        "execute-api:Invoke"
      ],
      "Resource": "arn:aws:execute-api:*:*:*"
    }
  ]
}
Now before we can call this REST service from other applications outside of this domain, we need to enable CORS for this service.
Enabling CORS for the newly created service
Follow this Amazon documentation that explains how to enable CORS for a service created through API Gateway.
Now we can call this REST service using JavaScript through a web application.
Calling Service through JavaScript
Follow the steps provided on this Generate an SDK for an API in API Gateway page to setup JavaScript SDK.
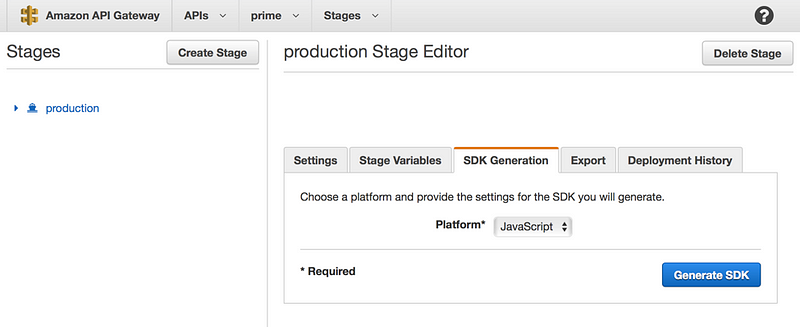
Make sure you follow the steps to enable CORS described earlier. Once you generate the JavaScript SDK, include the JavaScript libraries generated as shown below.
<script type="text/javascript" src="lib/axios/dist/axios.standalone.js"></script>
<script type="text/javascript" src="lib/CryptoJS/rollups/hmac-sha256.js"></script>
<script type="text/javascript" src="lib/CryptoJS/components/hmac.js"></script>
<script type="text/javascript" src="lib/CryptoJS/components/enc-base64.js"> </script>
<script type="text/javascript" src="lib/moment/moment.js"></script>
<script type="text/javascript" src="lib/url-template/url-template.js"></script>
<script type="text/javascript" src="lib/apiGatewayCore/sigV4Client.js"></script>
<script type="text/javascript" src="lib/apiGatewayCore/apiGatewayClient.js"></script>
<script type="text/javascript" src="lib/apiGatewayCore/utils.js"></script>
<script type="text/javascript" src="apigClient.js"></script >
Then, write JavaScript using the apigClient object to interact with the REST service created. To pass the access key and secret key, you need to create a new client using the following code assuming elements accessKey and secretKey are HTML inputs with the AWS access key and secret key.
var apigClient = apigClientFactory.newClient({
    accessKey: document.getElementById("accessKey").value,
    secretKey: document.getElementById("secretKey").value,
    });
You can review the Amazon documentation on this here.
Note: If you created the API Gateway REST service without IAM authentication, anyone can invoke it. You can pass any number through an HTML element and any additional parameters you need to invoke the service as shown below.
var body = document.getElementById("number").value;

var params = {
// This is where any modeled request parameters should be added.
// The key is the parameter name, as it is defined in the API in API Gateway.
    //param0: '',
    //param1: ''
};

var additionalParams = {
    // If there are any unmodeled query parameters or headers that must be
    // sent with the request, add them here.
    headers: {
        //param0: '',
        //param1: ''
    },
    queryParams: {
        //param0: '',
        //param1: ''
    }
};
Finally, call the REST Service by passing in the parameters, which contain the integer (params, body) that will be evaluated by the service and any other additionalParams as shown below. The result will update the HTML element res with the REST service output.
apigClient.prime(params, body, additionalParams)
                .then(function(result){
                res.innerHTML = JSON.stringify(result);
            }).catch(function(result){
                res.innerHTML = "Sorry, API Gateway is not responding";
            });
By using AWS, you can quickly create a simple REST service with auto scaling and integrated authentication in a very short amount of time. This solution is one of the ways to implement services that conform to the Microservice Architecture.